I had no idea how much electricity my house was burning through until I set up Home Assistant's Energy Dashboard. Within a month, I'd identified three devices that were absolutely guzzling power and cut my bill by 15%. That dashboard paid for itself.
The Home Assistant Energy Dashboard isn't just beautiful—it's genuinely useful. You can see your electricity consumption by hour, day, month, and year. Add solar, and it tracks your self-consumption ratio. Add gas, and you monitor heating costs. Everything in one place.
Setting it up is straightforward if you know what hardware you need and which sensors to configure. Let me walk you through it.
Step 1: Choose Your Energy Monitoring Hardware
You need something to measure your electricity consumption. Three solid options:
Option A: Emporia Vue 3 (Best All-Around Value)
Cost: ~$100 Installation: Clips around one wire on your electrical panel Data: Real-time kWh consumption via Wi-Fi Home Assistant: Native integration
The Emporia Vue 3 is my recommendation for most people. It's non-invasive—you don't modify anything, just clip a sensor around the main power line in your breaker box. No electrician needed.
The Vue 3 measures total household consumption and can also measure individual breakers if you add optional sub-metering clips (~$20 each). Home Assistant integration works perfectly. Data is local after initial setup.
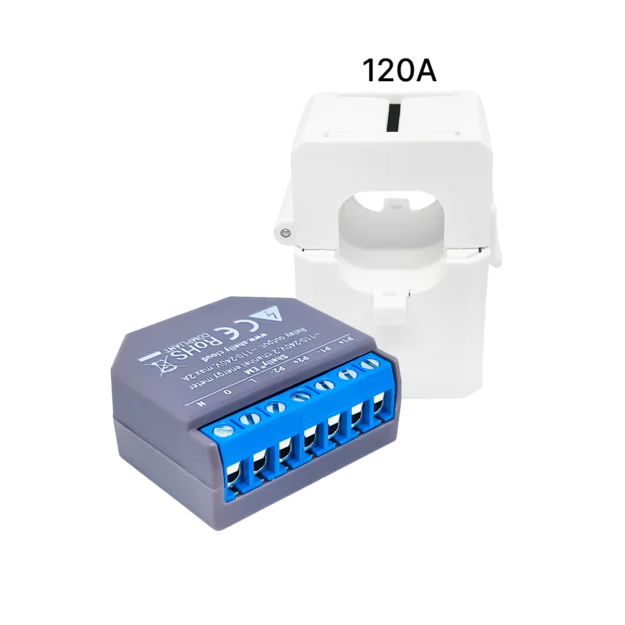
Option B: Shelly EM (Cheapest Wired Option)
Cost: ~$30 Installation: Clip around main power line or CT clamps on individual circuits Data: Real-time kWh via Wi-Fi, local API Home Assistant: MQTT or HTTP integration
The Shelly EM is a tiny Wi-Fi relay with a current transformer clamp. Clip it around your main power line to measure household consumption. Or use CT clamps to monitor individual circuits (solar feed, EV charger, water heater, etc.).
The advantage: everything talks to Home Assistant via a local API. No cloud dependency. The disadvantage: you need to mount it somewhere in or near your breaker box, and the setup is more technical than Emporia.
Option C: ESPHome DIY (Ultra-Budget)
Cost: ~$15-30 Installation: Build an ESP32 with CT clamp sensors Data: Local via MQTT Home Assistant: Native ESPHome integration
If you're comfortable soldering and writing YAML, you can build your own energy monitor with an ESP32 and CT clamp sensors. It's the cheapest route, but it requires electronics knowledge.
For most people, I'd skip this unless you love DIY. Emporia Vue 3 is worth the extra $70.
My pick: Emporia Vue 3. Best balance of price, ease, and reliability.
Step 2: Install Your Energy Monitor
I'll walk through Emporia Vue 3 since it's most common.
- Turn off your main breaker (safety first)
- Find the main power line entering your panel (two large wires)
- Open the Vue 3 sensor, place it around one of the main wires, and close it
- Turn the main breaker back on
- Download the Emporia Vue app, create an account, and pair the device
- Connect it to your home Wi-Fi
Seriously—that's it. The sensor measures consumption on one wire and assumes balanced load. If you want more granular data, add sub-metering clips to individual breakers (~$20 each clip, measures one breaker circuit).

Step 3: Add the Energy Integration in Home Assistant
- Go to Settings → Devices & Services → Integrations
- Search for and install the Emporia Vue integration (or whatever energy monitor you chose)
- Follow the login prompts
- The integration creates sensor entities like
sensor.emporia_vue_home_power_kw
Once integrated, you'll see energy sensors appearing in Home Assistant. These measure power in kilowatts (kW) or energy in kilowatt-hours (kWh).
Step 4: Configure the Energy Dashboard
Now for the fun part—actually setting up the dashboard.
- Go to Settings → Dashboards → Energy
- Click the three-dot menu and select Edit Dashboard
- Look for the "Energy consumed from the grid" card
- Click it and select your energy consumption entity (from your Emporia Vue or Shelly EM)
Home Assistant will ask: what unit is this sensor measuring? Choose "kWh" (energy) if it's a cumulative energy meter. Do NOT choose "W" (power). This is important—the dashboard needs cumulative energy to calculate costs correctly.
Grid consumption: Select your total kWh consumption sensor
Electricity rate: Enter your utility rate. If you have time-of-use pricing, set it up here. Most people pay a flat rate—just enter your cents per kWh.
Save. The dashboard now shows your daily, weekly, and monthly electricity consumption.
Step 5: Optional — Add Solar Production
If you have solar panels, add a production sensor.
For inverter users: Most modern solar inverters integrate with Home Assistant (SolarEdge, Enphase, etc.). Install the integration and select the "energy produced today" entity.
For Shelly EM users: Put a second CT clamp around your solar feed wire. Configure a second Shelly sensor and add it to the Energy Dashboard as "Solar production."
- Go back to Settings → Dashboards → Energy
- Click the "Solar production" card
- Select your solar production entity (kWh cumulative)
The dashboard now shows:
- How much you consumed from the grid
- How much you produced from solar
- Self-consumption ratio (what percentage of your solar you used versus exported)
- Costs and earnings
This is where things get interesting. You might discover that you're exporting during peak sun hours when nobody's home. Some people shift loads (start the laundry at midday, charge the EV during peak production) to maximize self-consumption.
Step 6: Optional — Add Gas Monitoring
Gas usage is usually tracked via a meter pulse counter. This requires an ESPHome setup or a smart gas meter integration (depends on your utility).
If your meter has a flashing LED or pulse output, you can use an ESPHome device with a pulse counter:
- Create an ESPHome device with a pulse counter on the gas meter LED
- Configure it to count pulses and convert to cubic meters or therms
- Integrate into Home Assistant
- Add to Energy Dashboard
Not every utility supports this, and some require technical setup. If your utility offers a smart meter integration (like some US utilities do), use that instead.
Step 7: Build Individual Device Tracking
The dashboard shows total consumption, but you probably want to know what's using the most power.
Add smart plugs with energy monitoring:
- Shelly Plug S (~$15 each)
- Emporia Vue sub-metering clips (~$20 each for individual breakers)
- TPLink Kasa Smart Plugs (~$20 each, work with HA)
Put these on major consumers: water heater, EV charger, dryer, AC unit (if on its own circuit), etc.
Create an "Energy" dashboard card showing each device's kWh consumption. Within a week, you'll see patterns: maybe your water heater is on 24/7 (upgrade the thermostat). Maybe the fridge is inefficient (time for replacement). These insights actually save money.
Step 8: Enable Forecast.Solar Integration
Home Assistant integrates with Forecast.Solar, a free service that predicts solar output based on weather forecasts and your location.
- Go to Settings → Devices & Services → Integrations
- Add the Forecast.Solar integration
- Enter your coordinates and panel tilt angle
- The Energy Dashboard shows predicted solar production alongside actual
Seeing tomorrow's predicted production helps you plan: "Will I have enough excess solar to charge the EV?" or "Should I delay laundry until afternoon?"
What You'll Actually Learn
Most people reduce their consumption by 10-20% just by seeing where energy actually goes. You discover phantom loads (devices drawing power while "off"), identify inefficient appliances, and shift usage to match solar production.
I discovered my water heater was staying hot 24/7 without reason. Adjusting the setpoint saved $8 per month. My dishwasher runs at 2 a.m. during cheap time-of-use rates. The EV charges during peak solar hours. Small changes, real savings.
The dashboard pays for itself in months.
Troubleshooting Common Issues
The dashboard shows zero consumption: Check that you selected a cumulative kWh sensor (not a W sensor). The dashboard calculates consumption from the difference between readings. If you use instantaneous power (watts), it can't do math.
Solar production isn't showing: Make sure your inverter integration is set up and the energy sensor is exposed. Some inverters require manual sensor creation in Home Assistant.
Costs are wildly off: Verify your electricity rate. If you have time-of-use pricing, set it up correctly. Rates change—update them annually.
Data keeps resetting: Home Assistant's energy history stores data locally. If you reboot frequently, data might not stick. Consider adding a mariadb backend for persistent storage (more advanced setup).
Final Thoughts
The Home Assistant Energy Dashboard is one of the most practical features in Home Assistant. It moves energy monitoring from abstract concepts to real, actionable data.
Spend a weekend getting it set up, then spend a month watching the patterns. You'll be surprised what you learn about how your house actually uses power.
Buy Emporia Vue 3 on Amazon — Best all-in-one energy monitoring.
Buy Shelly EM on Amazon — Budget option with local control.